

Preserved Lemons: How to Make and Use Them
The first time I chopped a sliver of preserved lemon rind into a bowl of roasted cauliflower, the whole dish changed. It tasted brighter, saltier, deeper, and somehow more Mediterranean, all from a spoonful of something I’d made with nothing but lemons, salt, and time.
Preserved lemons are one of the simplest preserves you can make. According to UC Master Food Preservers, salted lemons need no special heat processing; their high salt content and acidity, followed by refrigeration, keep them for at least six months. The trick is getting the balance right: enough salt to preserve and soften the rind, but not so much that every bite tastes like seawater, and enough juice to keep every piece fully covered.
This version came out of two full test batches, and the second one fixed every problem from the first. If you’re new to salting and brining, my Mediterranean preserving guide explains the science behind salt, acid, and time. By the end of this recipe, you’ll have a jar of soft, golden, intensely fragrant lemons ready to transform roasted vegetables, grain bowls, dressings, and tagines.

What I Learned From Testing This Recipe
Recipe Testing Note Tested in two full batches of 6 lemons each. Last updated: October 2026. Equipment: 750 ml glass jar, wooden muddler, cured at room temperature away from direct sunlight, then stored in the refrigerator. Key variables tested: salt amount per lemon, fine vs. coarse sea salt, and adding extra lemon juice to keep the fruit covered.
My first batch taught me more than I expected. I used 6 organic, unwaxed Eureka lemons, cut them into quarters with the ends still attached, and packed them with about 1 tablespoon of fine sea salt per lemon, plus another 2 tablespoons between the layers. I pressed them down hard and waited for the juice to rise.
It didn’t rise enough. After two days, the top two lemons were sticking out of the liquid. I topped the jar up with extra lemon juice, but the damage was done: after three weeks, the rinds at the top were still firm, and the whole batch needed almost four weeks before the rinds were truly soft. The flavor was good, with no mold, off smells, or discoloration, but it was so salty that I could only use a tiny amount at a time.
For the second batch, I changed four things at once, and every one of them helped.
What I changed after testing: I cut the salt from about 1 tablespoon to about 2 teaspoons per lemon, switched from fine to coarse sea salt, and added 150 ml of freshly squeezed lemon juice from the start so the fruit was completely covered. I also cut the lemons a little deeper and pressed them down again after 24 hours. The rinds turned soft at about 21 to 23 days instead of nearly a month, and the salt flavor was far less aggressive.
Ingredients
Makes one jar of 6 preserved lemons (24 quarters)
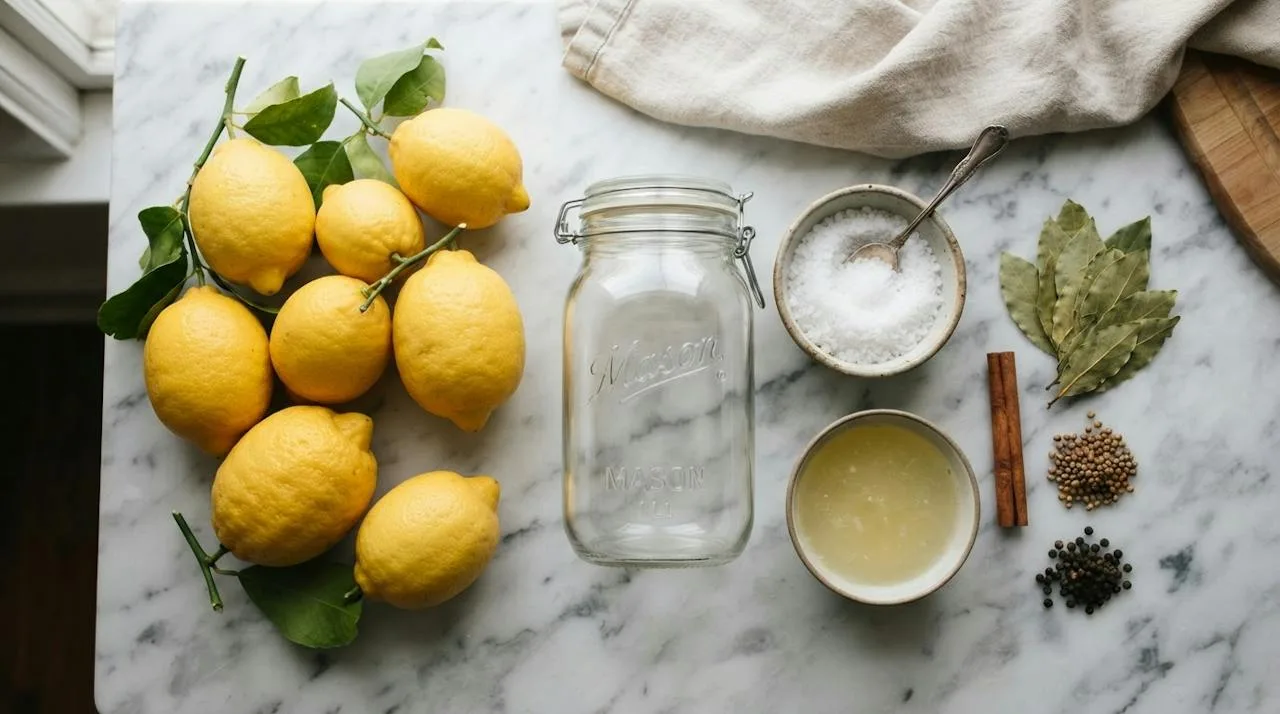
- 6 organic, unwaxed Eureka lemons, scrubbed and dried completely
- About 4 tablespoons coarse sea salt (roughly 2 teaspoons per lemon)
- 150 ml (about ⅔ cup) freshly squeezed lemon juice, from 4 to 5 extra lemons, plus more for topping up
- 1 bay leaf (optional)
- ½ teaspoon coriander seeds (optional)
- 1 small dried chili (optional)
You’ll also need a clean glass jar with a tight lid. I used a 750 ml jar; whatever you use, leave enough room for the juice to cover the lemons completely.
Note on salt: I switched from fine sea salt to coarse sea salt in round 2. Coarse salt dissolves more slowly, but it gave a better result and was easier to pack into the cuts without overdoing it.
Before You Start: What to Watch For
- Dry lemons completely after washing. Extra water on the skins dilutes the brine. I wash, then leave the lemons on a towel until no moisture remains.
- Coverage is everything. In my first batch, the two lemons that sat above the juice were the ones that stayed hard. Every piece must stay under the liquid for the whole cure.
- Cut deep, but keep the base attached. Cutting a little deeper in round 2 let the salt reach further into the flesh, which helped the rinds soften evenly. Stop about 1 cm (½ inch) from the base so each lemon holds together.
- Expect cloudy, syrupy brine. As the lemons cure, the juice thickens and turns cloudy. That’s normal. Fuzzy mold or a bad smell is not.
- Plan to use them sparingly. A small amount of finely chopped rind brings a big salty-citrus hit. Preserved lemon works the way briny olives and capers do in the Mediterranean kitchen: as a seasoning, not a main ingredient. My Mediterranean diet guide for beginners explains how these bold, briny flavors replace a lot of plain salt in everyday cooking.
Method
- Scrub and dry the lemons. Wash the 6 lemons well under running water, then dry them completely. They’re ready when the skins feel dry and slightly waxy to the touch, with no beads of water in the dimples.
- Cut each lemon into quarters, keeping the base attached. Stand a lemon on its stem end and cut down from the tip, stopping about 1 cm (½ inch) from the bottom. Turn it 90 degrees and cut again so you have four quarters joined at the base. The lemon should open like a flower when you gently pry it apart.
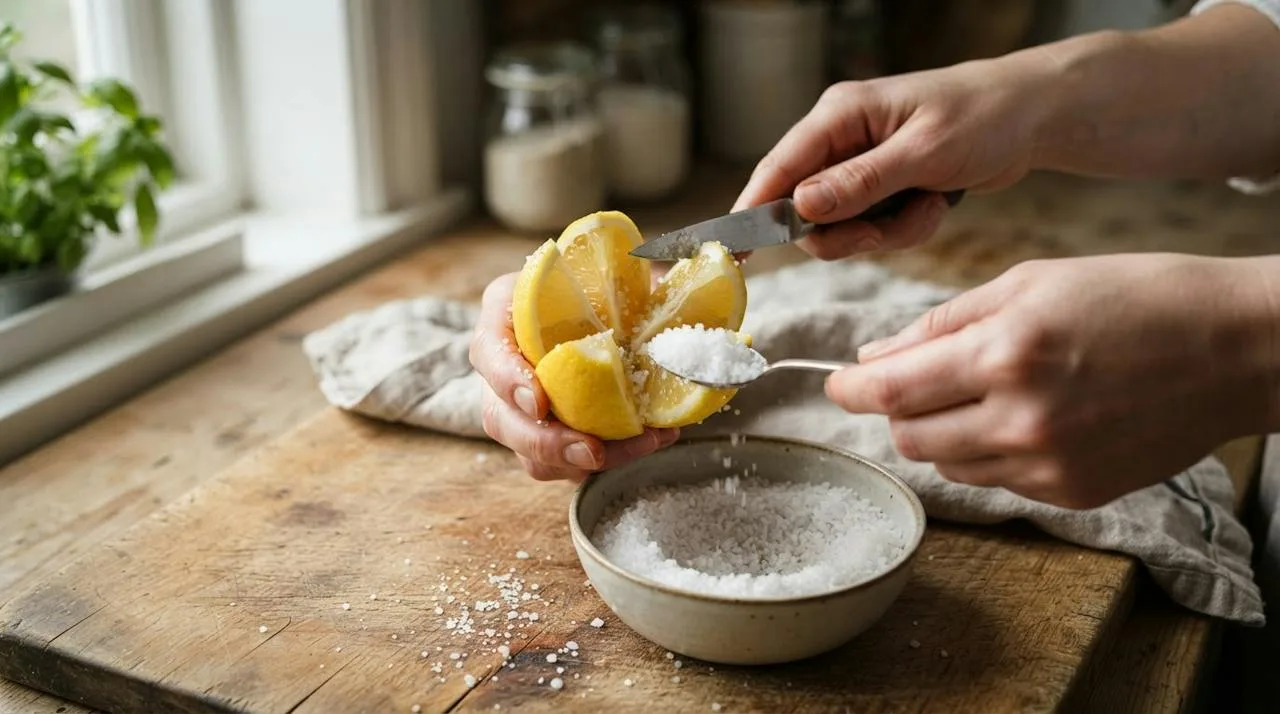
- Salt the inside of each lemon. Hold each lemon open over a bowl and pack about 2 teaspoons of coarse sea salt into the cuts, rubbing it over the exposed flesh. In testing, the salt clung better and spread more evenly once the cuts were a little deeper.
- Pack the jar tightly. Press the salted lemons into the jar one at a time, squeezing them so their juice runs out. Tuck in the bay leaf, coriander seeds, and chili between the layers. Sprinkle any salt left in the bowl over the top. The lemons should be packed snugly, with very little air between them.
- Pour in the extra lemon juice. Add the 150 ml of fresh lemon juice. Press down firmly with a wooden muddler or spoon. Check the level: the liquid should cover the top lemons completely. If it doesn’t, add more juice until it does. This was the single biggest fix between my two batches.
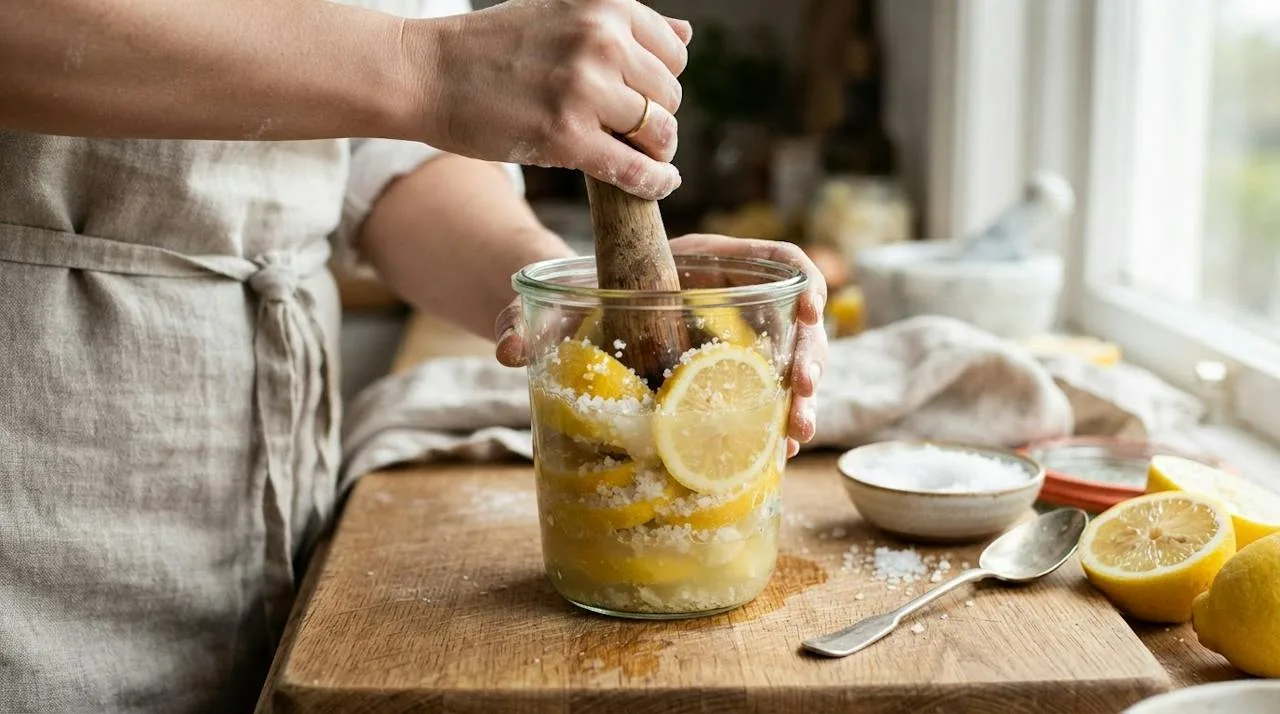
- Seal and leave at room temperature. Close the lid and keep the jar somewhere cool and out of direct sunlight. I kept mine on a kitchen shelf away from the window.
- Press again after 24 hours. Open the jar and press the lemons down once more. By now they’ve softened slightly and released more juice. Make sure everything is still submerged, and add a splash of lemon juice if the top pieces are peeking out.
- Turn or shake the jar every day or two. This redistributes the salt and juice. Check the liquid level each time; every lemon should stay covered.
- Start checking at day 14. Remove one quarter with a clean fork and press it with a knife. At this stage, the rind usually still has some firmness in the middle.
- Cure until the rind is soft and slightly translucent. In my second batch, this took about 21 to 23 days. In the first batch, which had too little juice and too much salt, it took nearly 4 weeks. The lemons are ready when the rind looks slightly translucent, cuts easily with no resistance, and the pieces still look intact rather than completely collapsed.
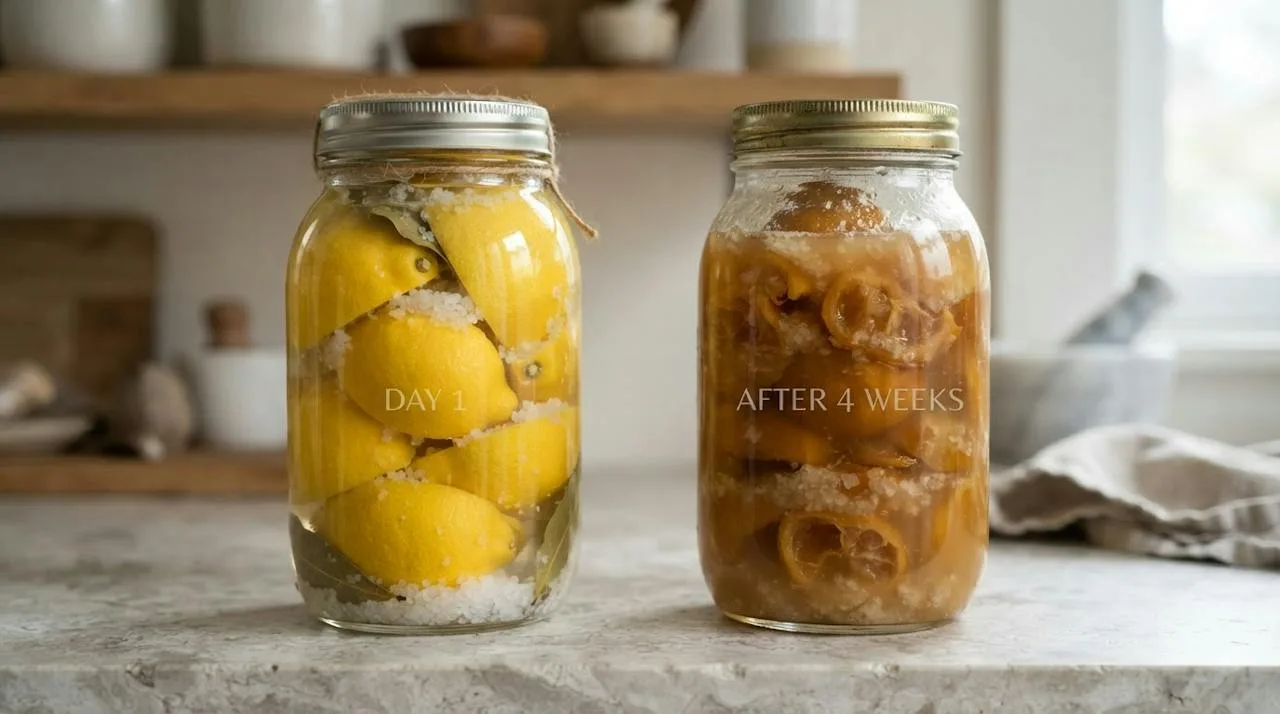
- Move the jar to the refrigerator. Top up with lemon juice if needed so every piece stays covered, then refrigerate.
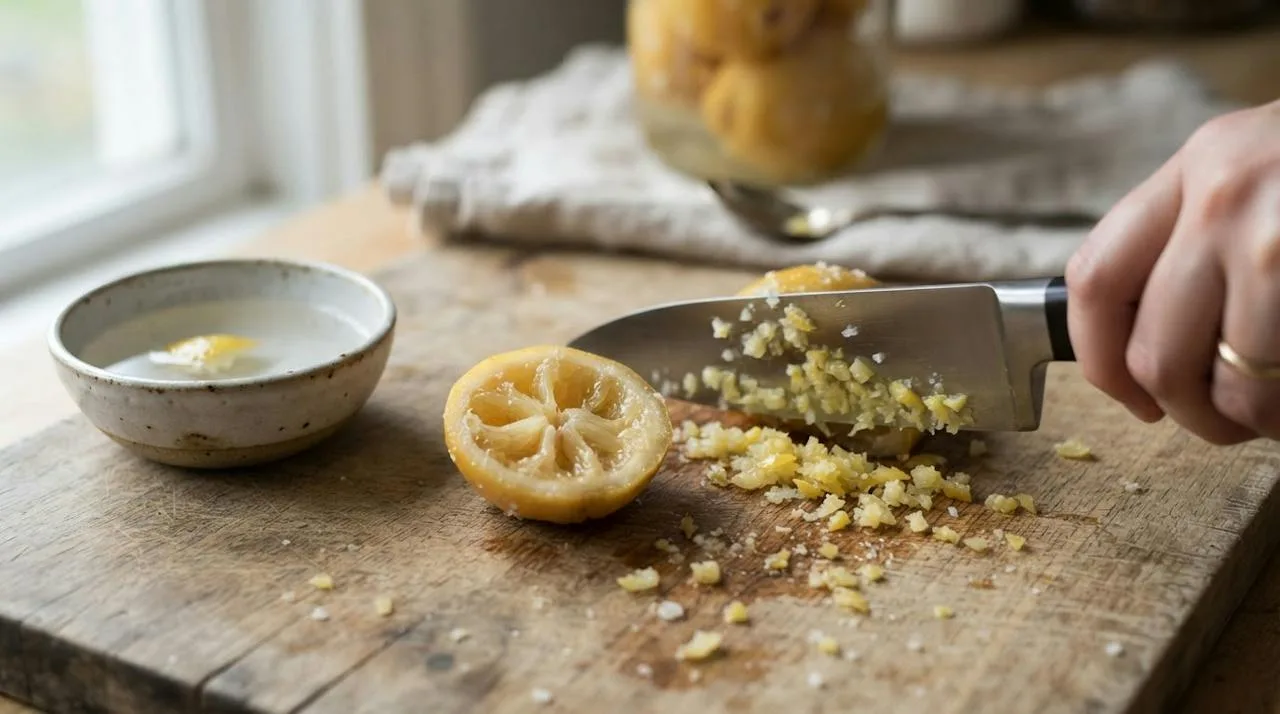
- To use, rinse and chop the rind. Lift out a quarter with a clean fork. Scrape away most of the flesh and pith, rinse the rind briefly to remove surface salt, and chop it very finely. I mostly use the rind; removing most of the flesh makes the flavor easier to control.
Tested Substitutions
| Original ingredient | Tested substitute | Result |
|---|---|---|
| Fine sea salt | Coarse sea salt | Tested. Dissolved more slowly but gave a better result, with softer rinds and a less aggressive salt flavor (combined with less salt overall). |
| No spices | Bay leaf | Tested. Mild, herbal background flavor. Subtle but pleasant. |
| No spices | Coriander seeds (½ tsp) | Tested. A slight citrusy, spicy note. Subtle. |
| No spices | Small dried chili | Tested. Gentle background heat. Nice, but not essential. |
| Eureka lemons | Meyer lemons (untested) | I haven’t tried this yet. Let me know in the comments if you do. |
| Organic unwaxed lemons | Regular waxed lemons (untested) | I haven’t tried this yet. If you do, scrub very well to remove as much wax as possible. |
| Bay, coriander, chili | Cinnamon stick (untested) | I haven’t tried this yet. |
Why This Recipe Can Fail (And How to Fix It)
Common Problems
- Top lemons stay hard: This happened in my first batch because the top two lemons sat above the juice. Add extra fresh lemon juice at the start (I used 150 ml for 6 lemons), press the lemons down again after 24 hours, and check the level every time you open the jar.
- Too salty to use: About 1 tablespoon of salt per lemon plus extra between the layers made my first batch harsh. About 2 teaspoons per lemon gave a much more balanced result. If your lemons are already too salty, rinse the rind well and remove the flesh before chopping, and use less in each dish.
- Rinds take more than a month to soften: Shallow cuts, too little juice, and fine salt all slowed my first batch. Cut each lemon a little deeper (stopping about 1 cm from the base), keep everything covered, and give the jar a shake every day or two.
- White film or mold on top: A flat, white film on brine is often harmless yeast. Illinois Extension explains that a white film that isn’t fuzzy and isn’t growing in round patches is usually kahm yeast, while fuzzy mold means spoilage and the batch should be discarded. Neither of my batches developed either, which I credit to keeping every piece submerged and always using a clean fork.
- Lemons completely collapse: Over-cured or very thin-skinned lemons can turn mushy. Start checking at day 14, and move the jar to the fridge as soon as the rind is soft, slightly translucent, and still intact.
Serving Suggestions
A little preserved lemon goes a long way. Here’s how I used my test batches:
- Roasted vegetables: Toss finely chopped rind with cauliflower, carrots, or potatoes in the last few minutes of roasting, or scatter it over the finished tray. My guide to roasted Mediterranean vegetables covers the timing and temperatures.
- Grain and chickpea bowls: Stir chopped rind through the dressing. It gives every bite a bright, salty lift. See my Mediterranean grain bowls guide for the full formula.
- A quick lemony dressing: Whisk finely chopped rind with extra virgin olive oil and a little grated garlic. My guide to cooking with extra virgin olive oil helps you choose the right oil for dressings.
- White bean salad: White beans, parsley, olive oil, and a spoonful of chopped preserved lemon.
- Couscous and tagine: Fold it into couscous with roasted vegetables, or stir it into a vegetable tagine near the end of cooking.

Mediterranean Secret: Preserved lemon is salty, so taste before adding any extra salt to the dish. The American Heart Association recommends no more than 2,300 mg of sodium a day for most adults, and using preserved lemon in place of plain salt, rather than on top of it, keeps dishes bright without overdoing it.
Storage and Make-Ahead
While curing: Keep the jar at cool room temperature, out of direct sunlight, for about 3 weeks (until the rind is soft). Keep every piece covered with juice.
Refrigerator: Once cured, store the jar in the refrigerator with the lemons fully covered by juice. My second batch was still in good condition after about 3 months in the fridge. UC Master Food Preservers note that refrigerated salted lemons keep for at least 6 months.
Texture over time: The rind keeps softening slowly in the fridge, and the brine becomes thicker and more syrupy. Top up with a little fresh lemon juice whenever the top layer starts to look exposed.
Hygiene: Always use a clean fork to remove pieces. Never use your fingers or a utensil that has touched other food.
Garlic dressings: If you make the preserved lemon, olive oil, and garlic dressing, keep it in the fridge. The CDC advises refrigerating homemade oils made with garlic or herbs and throwing them away after 4 days, so make small batches.
Freezer: I haven’t tested freezing preserved lemons, so I can’t recommend it yet.
Make-ahead: Because they need about 3 weeks to cure, start a jar well before you need it. I like to keep one jar curing while another is in the fridge.
Continue Cooking
- How to brine olives, preserve lemons and pickle vegetables
- Mediterranean grain bowls: grains, legumes and dressings
- Roasting vegetables the Mediterranean way
With lemon on my hands and figs on the counter, Nevaeh Hall
Print
Preserved Lemons
- Total Time: 21 days 15 minutes
- Yield: 6 lemons (24 quarters)
- Diet: Vegetarian
Description
Transform your dishes with these vibrant preserved lemons, providing a bright, salty, and aromatic flavor.
Ingredients
- 6 organic, unwaxed Eureka lemons, scrubbed and dried completely
- About 4 tablespoons coarse sea salt (roughly 2 teaspoons per lemon)
- 150 ml (about ⅔ cup) freshly squeezed lemon juice, from 4 to 5 extra lemons, plus more for topping up
- 1 bay leaf (optional)
- ½ teaspoon coriander seeds (optional)
- 1 small dried chili (optional)
Instructions
- Scrub and dry the lemons.
- Cut each lemon into quarters, keeping the base attached.
- Salt the inside of each lemon.
- Pack the jar tightly with the salted lemons.
- Pour in the extra lemon juice.
- Seal and leave at room temperature.
- Press again after 24 hours.
- Turn or shake the jar every day or two.
- Start checking at day 14.
- Cure until the rind is soft and slightly translucent.
- Move the jar to the refrigerator.
- To use, rinse and chop the rind.
Notes
Ensure every piece of lemon stays submerged in the juice for the best results. Use preserved lemon sparingly as a seasoning.
- Prep Time: 15 minutes
- Cook Time: 21 days
- Category: Condiment
- Method: Curing
- Cuisine: Mediterranean


